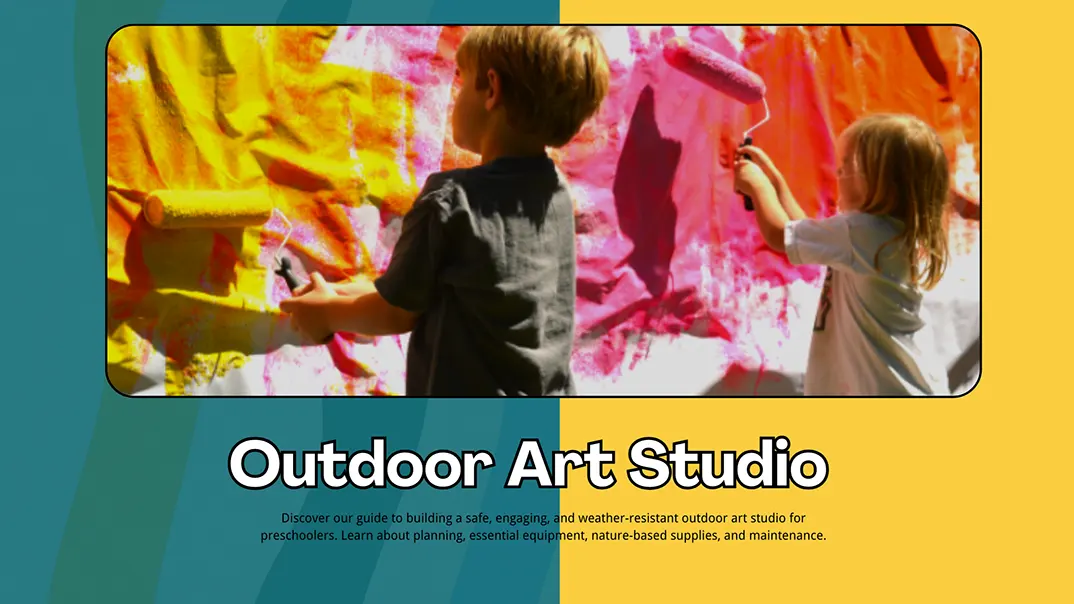
การสร้างสตูดิโอศิลปะกลางแจ้งสำหรับเด็กก่อนวัยเรียนหมายถึงการออกแบบพื้นที่การเรียนรู้กลางแจ้งอย่างตั้งใจ ซึ่งเด็กๆ สามารถวาดภาพ ปั้นดิน ทดลองกับวัสดุธรรมชาติ และสร้างสรรค์ผลงานได้อย่างอิสระในทุกฤดูกาล เป็นการสร้างสภาพแวดล้อมที่มีโครงสร้างพร้อมรับทุกสภาพอากาศที่สนับสนุนความเป็นอิสระ การสำรวจประสาทสัมผัส และการแสดงออกที่ปลายเปิด.
โรงเรียนหลายแห่งปฏิบัติต่อศิลปะกลางแจ้งเป็นกิจกรรมที่ทำเป็นครั้งคราว ความแตกต่างของสตูดิโอศิลปะกลางแจ้งที่แท้จริงคือความถาวรและวัตถุประสงค์ มีการกำหนดพื้นที่ทำงานที่ระดับความสูงของเด็ก พื้นผิวการทำงานที่เหมาะสม การจัดเก็บที่เข้าถึงได้ง่าย พื้นที่ล้างทำความสะอาดที่ปลอดภัย และวัสดุที่ทนทานซึ่งทนต่อแสงแดด ฝน และการใช้งานประจำวัน มันทำหน้าที่เป็นส่วนขยายของห้องเรียนมากกว่าการตั้งค่าชั่วคราว.
องค์กรชั้นนำด้านปฐมวัยเน้นย้ำว่า การเรียนรู้ผ่านการลงมือปฏิบัติอย่างกระตือรือร้นเป็นหัวใจสำคัญของการพัฒนาเด็ก สมาคมแห่งชาติเพื่อการศึกษาของเด็กปฐมวัย (NAEYC) เน้นการปฏิบัติที่เหมาะสมกับพัฒนาการ ซึ่งสร้างขึ้นจากการมีส่วนร่วมที่มีความหมาย American Academy of Pediatrics (AAP) ก็เน้นย้ำถึงคุณค่าทางพัฒนาการของการเล่นกลางแจ้งสำหรับการเติบโตทางสติปัญญา สังคม และร่างกาย An Outdoor Art Studio รวบรวมหลักการเหล่านี้ไว้ในพื้นที่ที่ตั้งใจออกแบบไว้โดยเฉพาะ.
คู่มือเล่มนี้จะแนะนำคุณในการสร้างสตูดิโอศิลปะกลางแจ้งที่ใช้งานได้จริง ทนทาน และสร้างแรงบันดาลใจ ซึ่งเหมาะสำหรับสภาพแวดล้อมของโรงเรียนอนุบาล.
มนต์เสน่ห์ของสตูดิโอศิลปะกลางแจ้ง
เมื่อศิลปะถูกนำไปจัดแสดงกลางแจ้งอย่างถาวรและตั้งใจ สิ่งนี้จะช่วยขยายทั้งความเป็นไปได้ในการสร้างสรรค์และผลลัพธ์ในการพัฒนา สนับสนุนพัฒนาการของเด็ก เสริมสร้างคุณภาพของโปรแกรม และยกระดับการวางตำแหน่งของศูนย์พัฒนาเด็กเล็กในระยะยาว.
เสริมสร้างความมั่นใจในความคิดสร้างสรรค์
บรรยากาศภายนอกอาคารช่วยขจัดข้อจำกัดทางกายภาพหลายประการที่มีอยู่ในอาคาร พื้นผิวที่กว้างขึ้น บริเวณที่ทำความสะอาดได้ง่าย และพื้นที่เปิดโล่งส่งเสริมการทดลอง เด็ก ๆ เต็มใจที่จะเสี่ยงกับการใช้สี ดินเหนียว และวัสดุผสมมากขึ้นเมื่อสภาพแวดล้อมรู้สึกผ่อนคลายกว่า เมื่อเวลาผ่านไป สิ่งนี้จะสนับสนุนการแก้ปัญหาอย่างสร้างสรรค์และการคิดที่ยืดหยุ่น.
ส่งเสริมพัฒนาการทางประสาทสัมผัสและการเคลื่อนไหว
ศิลปะกลางแจ้งมักเกี่ยวข้องกับการยืน การเอื้อม การขนย้ายสิ่งของ การผสมน้ำ หรือการทำงานกับพื้นผิวธรรมชาติ เช่น ทราย ใบไม้ และดิน การผสมผสานเหล่านี้ช่วยเสริมสร้างการควบคุมกล้ามเนื้อมัดเล็ก ขณะเดียวกันก็ส่งเสริมการประสานงานของกล้ามเนื้อมัดใหญ่ การวิจัยด้านการศึกษาปฐมวัยตลอดหลายทศวรรษยืนยันว่าการเคลื่อนไหวอย่าง, การเรียนรู้ผ่านการปฏิบัติ เป็นรากฐานของการพัฒนาความรู้ความเข้าใจในวัยเด็ก เมื่อกิจกรรมศิลปะเกิดขึ้นกลางแจ้ง การรับรู้ทางประสาทสัมผัสจะเพิ่มขึ้นและการเรียนรู้จะมีความเป็นรูปธรรมมากขึ้น สนับสนุนการเชื่อมต่อของระบบประสาทที่แข็งแกร่งขึ้นในช่วงพัฒนาการระยะแรก.
ช่วยเพิ่มสมาธิและการควบคุมอารมณ์
การศึกษาที่อ้างโดย American Academy of Pediatrics ชี้ให้เห็นว่าการเล่นกลางแจ้งช่วยให้เด็กมีสมาธิที่ดีขึ้นและลดความเครียด เมื่อการแสดงออกอย่างสร้างสรรค์เกิดขึ้นในสภาพแวดล้อมกลางแจ้ง เด็กๆ มักจะแสดงให้เห็นถึงช่วงเวลาที่ใช้ในการทำกิจกรรมที่ยาวนานขึ้นและการเปลี่ยนผ่านระหว่างกิจกรรมที่สงบลง ความเปิดโล่งทางกายภาพของ Outdoor Art Atelier ยังสามารถลดการกระตุ้นที่มากเกินไปซึ่งมักพบในห้องเรียนที่ปิด ซึ่งส่งผลให้พฤติกรรมที่สงบลงและมีสมาธิในการสร้างสรรค์ที่ยั่งยืนมากขึ้น.
สนับสนุนการเติบโตของการลงทะเบียนและความแตกต่างของโปรแกรม
นอกเหนือจากประโยชน์ทางการพัฒนาแล้ว สตูดิโอศิลปะกลางแจ้งยังมีคุณค่าเชิงกลยุทธ์อีกด้วย ครอบครัวต่างมองหาโปรแกรมการเรียนรู้ตั้งแต่เนิ่นๆ ที่ให้ความสำคัญกับประสบการณ์ตรงและ การศึกษาที่อิงธรรมชาติ. พื้นที่สร้างสรรค์กลางแจ้งที่ออกแบบมาอย่างดีกลายเป็นตัวบ่งชี้ที่ชัดเจนของนวัตกรรมและการวางแผนที่ใส่ใจ สำหรับโรงเรียนเตรียมอนุบาลหลายแห่ง สภาพแวดล้อมกลางแจ้งที่โดดเด่นช่วยเสริมความแข็งแกร่งให้กับการวางตำแหน่งทางการตลาด ปรับปรุงการทัศนาศึกษาในมหาวิทยาลัย และส่งผลเชิงบวกต่อการตัดสินใจในการรับเข้าเรียน สตูดิโอศิลปะกลางแจ้งไม่ใช่แค่พื้นที่การเรียนรู้ แต่เป็นความได้เปรียบทางการแข่งขัน.
ขั้นตอนที่ 1 – ตรวจสอบข้อกำหนดด้านใบอนุญาตและความปลอดภัย
เริ่มต้นด้วยความชัดเจนด้านกฎระเบียบ มาตรฐานการอนุญาตจัดตั้งศูนย์รับเลี้ยงเด็กในสหรัฐอเมริกา แคนาดา และออสเตรเลีย แตกต่างกันไปตามรัฐและจังหวัด และสภาพแวดล้อมการเรียนรู้กลางแจ้งอาจอยู่ภายใต้ข้อกำหนดเฉพาะที่เกี่ยวข้องกับพื้นผิว การมองเห็นการดูแล การเข้าถึงน้ำ การปกคลุมด้วยร่มเงา และโครงสร้างถาวร.
ตัวอย่างเช่น หลายเขตอำนาจศาลได้กำหนดกฎระเบียบเกี่ยวกับ:
- โซนกันกระแทกภายนอกและวัสดุปูพื้น
- การเข้าถึงสิ่งอำนวยความสะดวกในการล้างมือ
- ที่กันแดดถาวรหรือที่กันฝน
- ขนาดกลุ่มสูงสุดต่อผู้สอน
ก่อนตัดสินใจขั้นสุดท้ายในการออกแบบใดๆ โปรดปรึกษาหน่วยงานผู้ออกใบอนุญาตในท้องถิ่นของคุณเพื่อยืนยันว่าสิ่งใดได้รับอนุญาต การออกแบบให้เป็นไปตามข้อกำหนดนั้นง่ายกว่าการดัดแปลงสตูดิโอศิลปะกลางแจ้งที่ไม่เป็นไปตามข้อกำหนดหลังการตรวจสอบเป็นอย่างมาก.
ขั้นตอนที่ 2 – วางแผนและประเมินพื้นที่กลางแจ้งของคุณ
ก่อนเลือกเฟอร์นิเจอร์หรือซื้อวัสดุ โรงเรียนเตรียมอนุบาลต้องประเมินก่อนว่าพื้นที่กลางแจ้งสามารถรองรับสตูดิโอศิลปะกลางแจ้งที่ใช้งานได้จริงหรือไม่ การดำเนินการให้ประสบความสำเร็จขึ้นอยู่กับการวางแผนอย่างรอบคอบมากกว่าขนาด.

1. ทำการศึกษาเงาแดดตลอดวัน
สังเกตการณ์พื้นที่ในเวลาต่างๆ ของวัน เป็นระยะเวลาอย่างน้อยหนึ่งสัปดาห์ บันทึก:
- การรับแสงยามเช้า
- ความเข้มแสงอาทิตย์สูงสุดช่วงกลางวัน
- ร่มเงายามบ่ายแก่
ที่ตั้งสตูดิโอศิลปะกลางแจ้งที่สมบูรณ์แบบควรมีร่มเงาตามธรรมชาติบางส่วน หรือสามารถติดตั้งโครงสร้างบังแดดได้โดยไม่กระทบต่อการดูแลมากเกินไป แสงแดดโดยตรงที่มากเกินไปจะลดชั่วโมงที่ใช้งานได้และเร่งการเสื่อมสภาพของวัสดุ ร่มเงามากเกินไปอาจจำกัดทัศนวิสัยและพื้นที่ตากผลงานศิลปะ.
หากเป็นไปได้ โปรดร่างแผนภาพเส้นทางดวงอาทิตย์อย่างง่าย เพื่อทำความเข้าใจการเปลี่ยนแปลงตามฤดูกาล ในภูมิภาค เช่น ออสเตรเลีย หรือทางตอนใต้ของสหรัฐอเมริกา ต้องพิจารณาการสัมผัสรังสียูวีอย่างรอบคอบเมื่อเลือกทำเลที่ตั้ง.
2. ทดสอบความมั่นคงและการระบายน้ำของพื้นผิว
ตรวจสอบพื้นดินหลังฝนตก มีน้ำขังหรือไม่? บริเวณนั้นกลายเป็นโคลนหรือไม่? กิจกรรมศิลปะกลางแจ้งมักเกี่ยวข้องกับน้ำ ดังนั้นพื้นผิวจะต้องคงที่ภายใต้การสัมผัสกับความชื้นบ่อยครั้ง.
ตรวจสอบเพื่อ:
- ระดับการให้คะแนน
- ทิศทางความลาดเอียงตามธรรมชาติ
- การเข้าถึงทางระบายน้ำ
- การกันลื่น
พื้นคอนกรีตหรือพื้นระเบียงอาจต้องใช้น้ำยาเคลือบกันลื่น พื้นหญ้าอาจต้องเสริมความแข็งแรงหรือใช้วัสดุแข็งบางส่วนเพื่อป้องกันการสึกกร่อน.
3. ประเมินสายตาและการมองเห็น
ยืนในจุดสังเกตปกติของผู้สอนและประเมินทัศนวิสัย สตูดิโอศิลปะกลางแจ้งควรเปิดโอกาสให้เด็กๆ เคลื่อนไหวได้อย่างอิสระ ขณะเดียวกันก็ต้องมีการดูแลอย่างใกล้ชิดจากจุดสังเกตที่คงที่อย่างน้อยหนึ่งจุด.
ถาม:
- สามารถมองเห็นโซนกิจกรรมทั้งหมดได้โดยไม่ต้องจัดตำแหน่งใหม่หรือไม่
- มีการบดบังทัศนวิสัย เช่น รั้ว อุปกรณ์ หรือต้นไม้หรือไม่?
- พื้นที่แยกออกจากพื้นที่เล่นกลางแจ้งหลักหรือไม่
หากการกำกับดูแลจำเป็นต้องมีการย้ายที่อยู่ตลอดเวลา การดำเนินงานในแต่ละวันจะไม่มีประสิทธิภาพ.
4. ประเมินความใกล้เคียงกับสาธารณูปโภค
การเข้าถึงน้ำช่วยเพิ่มประโยชน์ใช้สอยได้อย่างมาก วัดระยะทางไปยังแหล่งน้ำที่ใกล้ที่สุดและพิจารณาว่าการขยายระบบประปาเป็นไปได้หรือไม่ หากไม่สามารถต่อประปาได้โดยตรง ให้พิจารณาว่าสถานีน้ำเคลื่อนที่สามารถใช้งานได้จริงในชีวิตประจำวันหรือไม่.
นอกจากนี้ พิจารณาเรื่องพื้นที่จัดเก็บด้วย หากต้องขนย้ายวัสดุเป็นระยะทางไกลในแต่ละวัน เวลาในการติดตั้งและเก็บกวาดจะลดทอนความเป็นไปได้ในการใช้งานสตูดิโอ.
ขั้นตอนที่ 3 – การออกแบบผังของสตูดิโอศิลปะกลางแจ้ง
สตูดิโอศิลปะกลางแจ้งที่มีประสิทธิภาพควรจัดระเบียบโดยพิจารณาจากวิธีการสร้างสรรค์ของเด็กๆ เมื่อการตัดสินใจในการจัดวางพื้นที่เป็นไปตามรูปแบบพฤติกรรมการสร้างสรรค์ จะทำให้พื้นที่นั้นเป็นธรรมชาติ มีประสิทธิภาพ และสอดคล้องกับการพัฒนาการมากขึ้น.
เริ่มต้นด้วยเส้นทางการหมุนเวียน
เริ่มต้นด้วยการจินตนาการว่าเด็ก ๆ จะใช้พื้นที่นี้อย่างไรในแต่ละวัน พวกเขาเข้าทางไหน? พวกเขามักจะรวมตัวกันที่ไหน? กิจกรรมใดที่ทำให้เกิดการเคลื่อนไหวมากที่สุด?
แทนที่จะจัดวางเวิร์กสเตชันแบบสุ่ม ควรจัดผังโดยคำนึงถึงการเปลี่ยนผ่านกิจกรรมของเด็กๆ โซนที่ต้องเคลื่อนไหวซึ่งต้องมีการยืนหรือใช้ท่าทางที่ใหญ่ ไม่ควรไปรบกวนพื้นที่ที่เงียบกว่าซึ่งต้องการสมาธิ เส้นทางการสัญจรที่ชัดเจนช่วยป้องกันความแออัดและลดการรบกวนโปรเจกต์ที่กำลังดำเนินอยู่โดยไม่ได้ตั้งใจ.
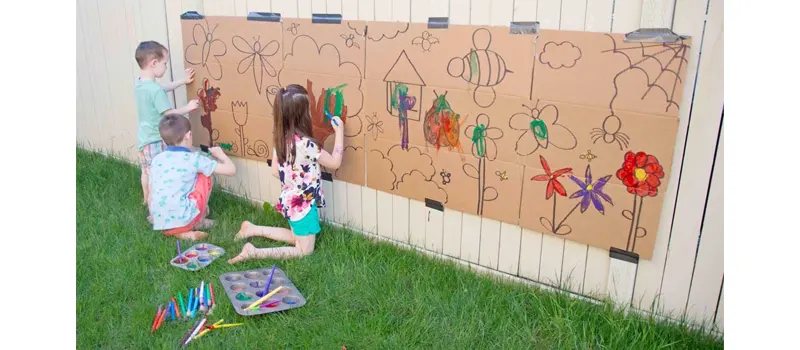
โซนการแสดงออกแนวตั้ง
โซนการแสดงออกแนวตั้งรองรับการวาดภาพขนาดใหญ่ การสร้างสรรค์ลายเส้น และการเคลื่อนไหวที่แสดงออก การทำงานบนพื้นผิวแนวตั้งส่งเสริมการเคลื่อนไหวของแขนทั้งแขน และช่วยให้เด็กๆ มีส่วนร่วมกับผลงานศิลปะของตนเองผ่านการลงมือทำ.
จัดวางพื้นผิวทำงานแนวตั้งตามแนวขอบ เช่น รั้วหรือกำแพง เพื่อให้พื้นที่ส่วนกลางเปิดโล่งและป้องกันไม่ให้เด็กๆ เดินอ้อมไปข้างหลังช่างทาสีที่กำลังทำงานอยู่ ตรวจสอบให้แน่ใจว่าพื้นที่ดังกล่าวมีพื้นที่สำหรับเคลื่อนไหวไปด้านข้างเพียงพอ เพื่อไม่ให้เด็กๆ อึดอัด วางโซนนี้ในบริเวณที่มีแสงสว่างสม่ำเสมอแต่ไม่จ้าจนเกินไป หากเป็นไปได้ ให้หลีกเลี่ยงแสงแดดจัดช่วงกลางวันเพื่อปกป้องทั้งวัสดุและความสะดวกสบาย.

แนะนำเฟอร์นิเจอร์:
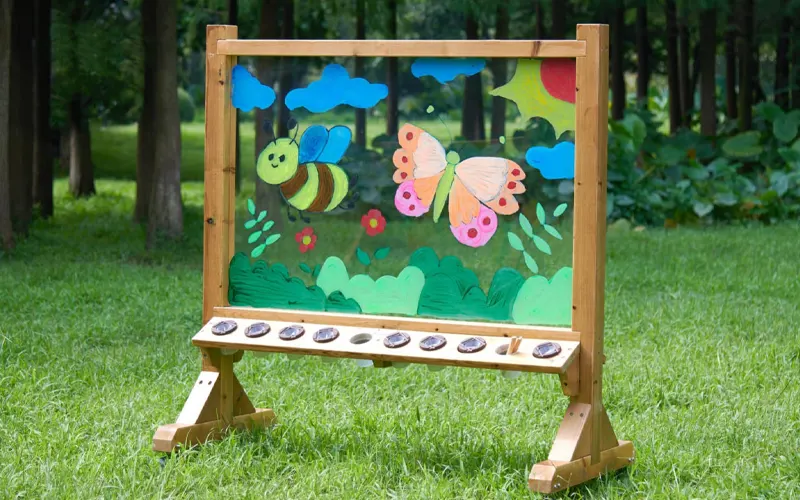
- ขาตั้งอะคริลิค/เพอร์สเพกซ์แบบตั้งพื้น: ขาตั้งวาดภาพใสสองหน้าเหมาะที่สุดสำหรับการวาดภาพนอกสถานที่.
- กระดานดำติดผนังกลางแจ้ง: กระดานดำขนาดใหญ่ทนต่อสภาพอากาศ ติดตั้งกับรั้วหรือผนังอาคาร.
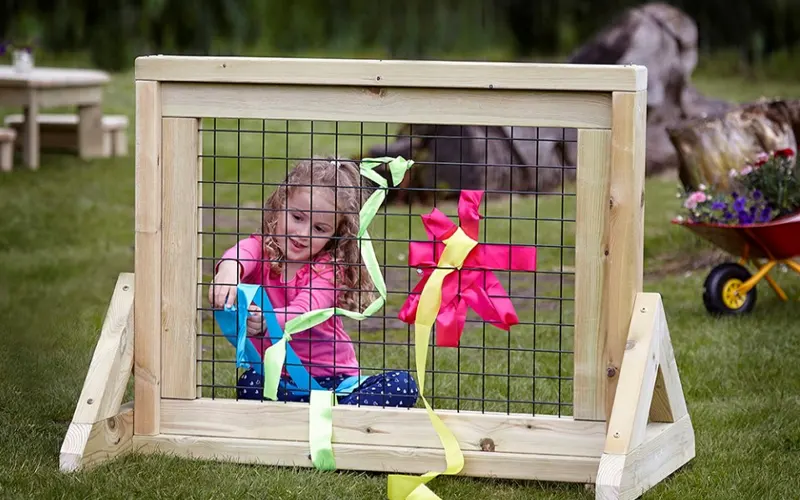
- โครงทอผ้าติดรั้ว โครงตารางหรือโครงที่แข็งแรงซึ่งติดอยู่กับรั้วที่มีอยู่สำหรับการทำกิจกรรมสาน.
พื้นที่การก่อสร้างและประกอบแนวนอน
งานศิลปะทุกชิ้นไม่ใช่งานที่ใช้ฝีแปรงที่สื่ออารมณ์ เด็กจำนวนมากมีส่วนร่วมในการประกอบที่ละเอียดประณีต การปั้น การแปะ และการปั้นดินเหนียว ซึ่งต้องการพื้นผิวแนวนอนที่มั่นคง.
โซนนี้รองรับงานที่ต้องใช้สมาธิและสัมผัส ซึ่งได้รับประโยชน์จากเวิร์กสเตชันที่ความสูงระดับโต๊ะ สิ่งสำคัญคือความมั่นคงและระยะห่างที่เพียงพอระหว่างโต๊ะเพื่อป้องกันความแออัด โต๊ะกลางแจ้งควรจัดวางไว้ในบริเวณที่มีแสงธรรมชาติเพียงพอแต่ไม่จ้าจนเกินไป และเข้าถึงแหล่งน้ำได้สะดวกหากวัสดุต้องล้างทำความสะอาด บริเวณนี้มักจะรองรับการทำงานที่ใช้เวลานาน ดังนั้นการอยู่ใกล้ที่เก็บของจึงมีความสำคัญสำหรับการตั้งค่าและการทำความสะอาดที่มีประสิทธิภาพ.
แนะนำเฟอร์นิเจอร์:
- โต๊ะศิลปะทนทานต่อสภาพอากาศ: พื้นผิวเรียบที่ทนทานสำหรับงานดินเหนียว งานคอลลาจ และโครงการที่ต้องการรายละเอียด.
- เก้าอี้สตูลหรือเก้าอี้กลางแจ้งที่แข็งแรงทนทาน: ที่นั่งที่มั่นคง ออกแบบมาสำหรับสภาพอากาศภายนอกและการใช้งานในชีวิตประจำวัน.
- ชั้นวางของแบบเปิด ที่เก็บที่เข้าถึงได้ง่ายซึ่งส่งเสริมการเลือกใช้วัสดุอย่างอิสระ.
- รถเข็นวัสดุมือถือ หน่วยที่เคลื่อนย้ายได้ที่ช่วยให้ตั้งค่าได้หลากหลายและทำความสะอาดได้ง่าย.
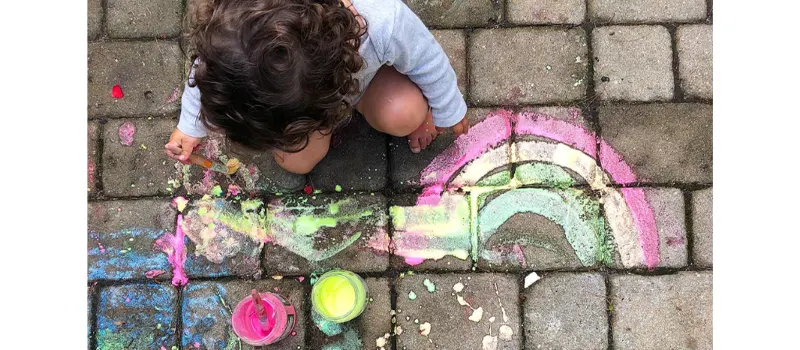
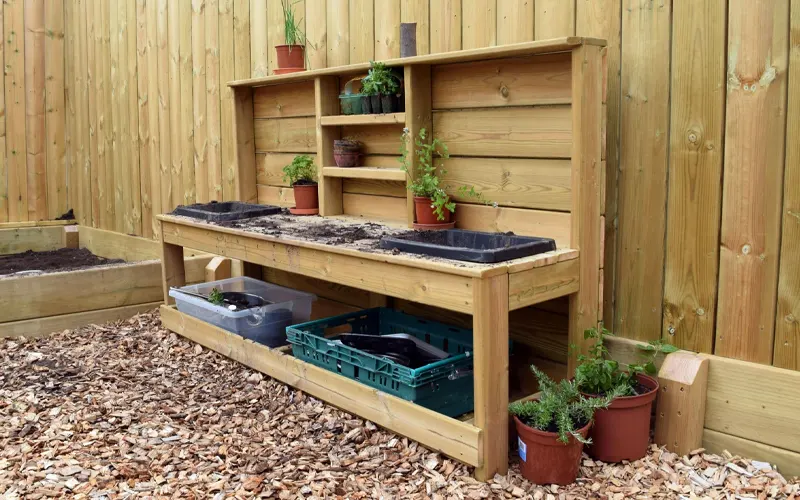
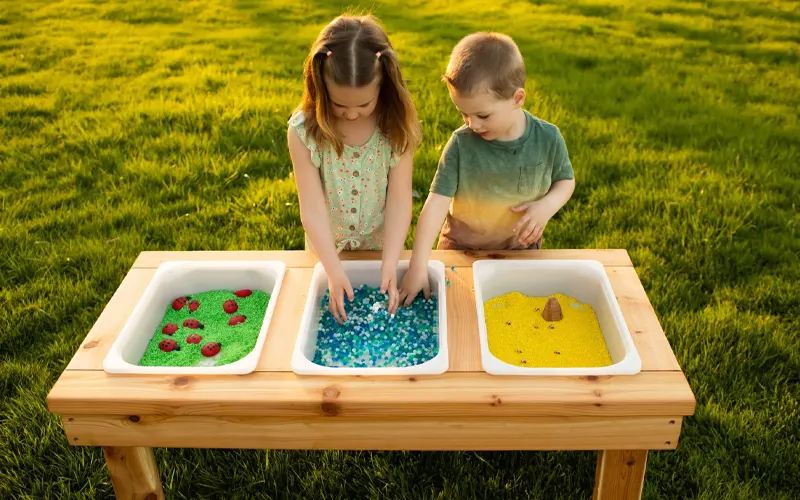
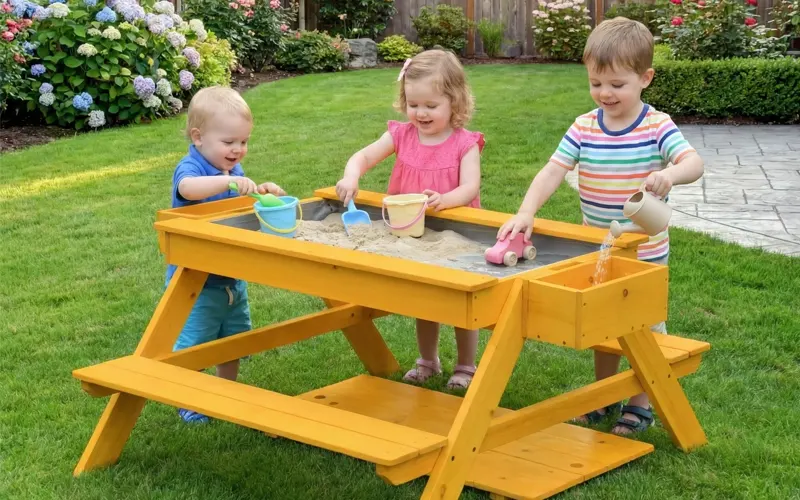
พื้นที่สำรวจเปียกและประสาทสัมผัส
พื้นที่สำรวจที่เปียกและเน้นประสาทสัมผัส ช่วยให้เด็กๆ ได้ทดลองกับน้ำ สีจากธรรมชาติ โคลน และวัสดุผสมต่างๆ ที่อาจจัดการได้ยากในอาคาร โซนนี้ช่วยขยายขอบเขตของสตูดิโอศิลปะกลางแจ้ง โดยยอมรับความเลอะเทอะเป็นส่วนหนึ่งของกระบวนการเรียนรู้ สนับสนุนการสำรวจผ่านการสัมผัส การค้นพบเหตุและผล และการทดลองปลายเปิด.
เลือกสถานที่ที่ระบบระบายน้ำมีประสิทธิภาพ และพื้นผิวสามารถทนต่อความชื้น การแยกตัวออกจากบริเวณที่แห้งหรือจัดแสดงเล็กน้อยจะช่วยป้องกันความเสียหายโดยไม่ตั้งใจ พิจารณาทิศทางลมและความมั่นคงของพื้นผิวเพื่อให้วัสดุอยู่เป็นที่ ตรวจสอบให้แน่ใจว่ามีจุดทำความสะอาดที่เข้าถึงได้ง่ายอยู่ใกล้ๆ ไม่ว่าจะเป็นอ่างล้างจานกลางแจ้งหรือสถานีล้างเคลื่อนที่พร้อมน้ำสบู่และผ้าเช็ด เพื่อให้การเปลี่ยนผ่านสำหรับผู้สอนง่ายขึ้น.
แนะนำเฟอร์นิเจอร์:
- ครัวโคลน: สถานีไม้กลางแจ้งแบบพิเศษพร้อมอ่างล้างจานและเคาน์เตอร์สแตนเลสในตัว.
- โต๊ะประสาทสัมผัส ถังพลาสติกหรือสแตนเลสแบบตั้งพื้นขนาดใหญ่ ออกแบบมาเพื่อการเล่นประสาทสัมผัส.
- โต๊ะทรายและโต๊ะน้ำ: สถานีอเนกประสงค์ที่ช่วยให้เด็กๆ ได้ผสมผสานทราย น้ำ และวัสดุธรรมชาติ เพื่อสร้างสรรค์งานศิลปะประสาทสัมผัสแบบปลายเปิด.
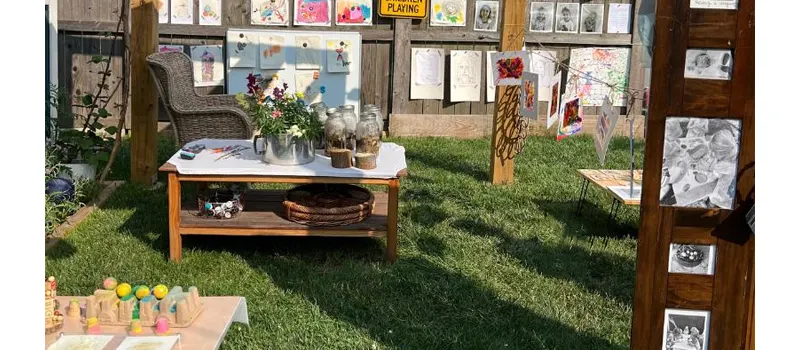
พื้นที่ดำเนินการ การทบทวน และการแสดงผล
พื้นที่กระบวนการและแสดงผลช่วยให้งานศิลปะไม่ถูกเก็บไปทันที เปิดโอกาสให้เด็กๆ ได้กลับมาทบทวน ไตร่ตรอง และแบ่งปันผลงานของตนเอง การเก็บผลงานสร้างสรรค์ไว้ให้มองเห็นเป็นการตอกย้ำว่าความพยายามทางศิลปะมีคุณค่าและดำเนินต่อไป.
จัดวางส่วนจัดแสดงผลงานและอุปกรณ์ในการทำให้แห้งในบริเวณที่มีหลังคาบางส่วนและได้รับการป้องกันจากฝนโดยตรง โดยให้สามารถมองเห็นได้ภายในแผนผังโดยรวม เพื่อให้เด็กๆ สามารถกลับมาดูผลงานของตนเองได้ แต่ให้อยู่ห่างจากบริเวณที่มีการสัญจรพลุกพล่าน.
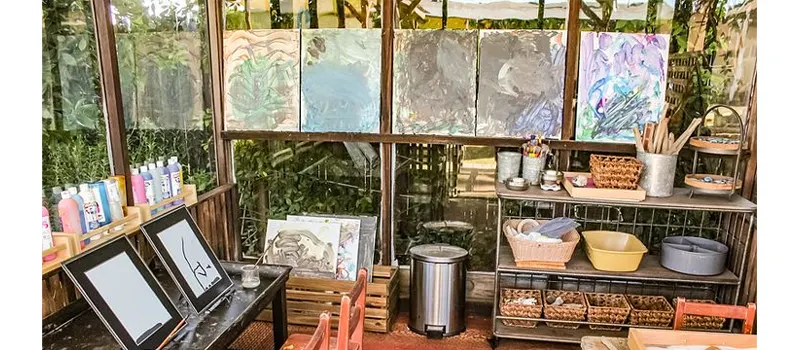
แนะนำเฟอร์นิเจอร์:
- ราวตากผ้ากลางแจ้ง: ราวตากผ้าโลหะหรือไม้ที่แข็งแรงทนทาน ไม่เป็นสนิม มีหลายชั้น.
- ที่นั่งขนาดสำหรับเด็ก กระเป๋าบีนแบ็กสำหรับกลางแจ้งที่กันแดดกันฝน, ตอไม้ที่ขัดผิว, หรือม้านั่งไม้ขนาดเล็ก.
- ตารางแสดงผลระดับต่ำ: แท่นวางเรียบง่าย หรือโต๊ะเตี้ยที่ใช้วางแสดงประติมากรรมเครื่องปั้นดินเผาหรือกิ่งไม้ที่เปราะบางอย่างปลอดภัยเท่านั้น.
การรวมโซนเข้าด้วยกัน
ไม่ใช่ทุกสถานรับเลี้ยงเด็กที่จะต้องการพื้นที่ขนาดใหญ่แยกกันสำหรับแต่ละกิจกรรม ในพื้นที่ที่เล็กกว่า โซนอาจมีขอบเขตที่ใช้ร่วมกันหรือสลับหมุนเวียนตามฤดูกาล สิ่งที่สำคัญคือความชัดเจนของวัตถุประสงค์และการจัดวางอย่างรอบคอบ.
สตูดิโอศิลปะกลางแจ้งที่วางแผนมาอย่างดีจะช่วยให้มีการเคลื่อนไหวอย่างกระฉับกระเฉงตามแนวรั้ว การทำงานที่เงียบสงบในพื้นที่ที่มั่นคง กิจกรรมที่เปียกชื้นอยู่ภายในพื้นที่ และผลงานที่เสร็จแล้วได้รับการปกป้อง เมื่อการตัดสินใจในการวางผังพื้นที่เป็นไปตามหลักการเหล่านี้ พื้นที่ก็จะดำเนินงานได้อย่างราบรื่นและยั่งยืน.
ขั้นตอนที่ 4 – การเลือกที่ทนทานและปลอดภัย เฟอร์นิเจอร์กลางแจ้ง
สภาพแวดล้อมกลางแจ้งมีความต้องการเฟอร์นิเจอร์ที่แตกต่างจากห้องเรียนในร่มอย่างมาก การสัมผัสแสงแดด ความชื้น การเปลี่ยนแปลงของอุณหภูมิ และการทำความสะอาดทุกวัน ล้วนส่งผลต่อประสิทธิภาพเมื่อเวลาผ่านไป การเลือกเฟอร์นิเจอร์ที่เหมาะสมสำหรับสตูดิโอศิลปะกลางแจ้ง ไม่ใช่เรื่องของความสวยงาม แต่เป็นเรื่องของความทนทาน ความปลอดภัย และความน่าเชื่อถือในระยะยาว.
เลือกวัสดุที่ออกแบบมาสำหรับสภาพอากาศภายนอก
เฟอร์นิเจอร์ในห้องเรียนทั้งหมดไม่เหมาะกับการใช้งานกลางแจ้ง วัสดุควรทนทานต่อการดูดซับความชื้น การแตกร้าวของพื้นผิว และความเสียหายจากรังสียูวี ไม้ที่ใช้กลางแจ้งควรมีการเคลือบที่เหมาะสม ขอบควรขัดเรียบ และข้อต่อควรเสริมความแข็งแรงเพื่อป้องกันการขยายตัวหรือแตกแยกเมื่อเวลาผ่านไป.
ส่วนประกอบที่เป็นโลหะควรทนทานต่อสนิม และสลักยึดควรคงความแน่นหนาแม้มีการเปลี่ยนแปลงอุณหบบ่อยครั้ง หากพื้นผิวต้องสัมผัสกับน้ำบ่อยครั้ง ควรเช็ดทำความสะอาดง่ายและแห้งเร็ว เมื่อประเมินวัสดุ ควรให้ความสำคัญกับประสิทธิภาพในระยะยาวมากกว่าการประหยัดต้นทุนในระยะสั้น.
ให้ความสำคัญกับความมั่นคงของโครงสร้างและความปลอดภัยของเด็ก
พื้นผิวภายนอกอาจไม่เรียบเสมอไป ซึ่งหมายความว่าเฟอร์นิเจอร์จะต้องมั่นคงแม้พื้นดินจะมีความแตกต่างเล็กน้อย โต๊ะและขาตั้งควรให้ความรู้สึกมั่นคงขณะใช้งาน และไม่ควรเคลื่อนที่เมื่อเด็กเอนตัวหรือออกแรงกด.
ขอบและมุมควรโค้งมนและเรียบเนียน วัสดุอุปกรณ์ไม่ควรโผล่ออกมาในลักษณะที่อาจเกี่ยวเสื้อผ้าหรือทำให้เกิดการบาดเจ็บ เฟอร์นิเจอร์น้ำหนักเบาอาจดูมีความยืดหยุ่น แต่ก็อาจไม่มั่นคงในสภาพแวดล้อมกลางแจ้งที่มีลมแรงหรือพื้นผิวไม่เรียบ ความปลอดภัยในสตูดิโอศิลปะกลางแจ้งมักเกี่ยวกับการป้องกันความเสี่ยงเล็กๆ น้อยๆ ที่เกิดขึ้นซ้ำๆ ซึ่งสะสมเมื่อเวลาผ่านไป.
พิจารณาเรื่องความสูง การเข้าถึง และความเป็นอิสระ
เฟอร์นิเจอร์ควรเข้ากับพัฒนาการของเด็กที่ใช้พื้นที่ โต๊ะทำงานที่สูงเกินไปจะลดการควบคุม ในขณะที่โต๊ะที่เตี้ยเกินไปจะส่งเสริมท่าทางที่ไม่ดี.
ชั้นวางแบบเปิดช่วยส่งเสริมความเป็นอิสระโดยการให้เด็กๆ เลือกและนำสิ่งของกลับเข้าที่ได้ด้วยตนเอง อย่างไรก็ตาม การเข้าถึงได้ต้องสมดุลกับการจัดระเบียบ การจัดเก็บที่ชัดเจนจะช่วยป้องกันไม่ให้ความยุ่งเหยิงลุกลามไปทั่วสตูดิโอ.
เลือกเฟอร์นิเจอร์ที่ดูแลทำความสะอาดและบำรุงรักษาง่าย
กิจกรรมศิลปะกลางแจ้งก่อให้เกิดคราบสี น้ำหก เศษดินเหนียว และวัสดุธรรมชาติ เฟอร์นิเจอร์ควรทำความสะอาดง่ายโดยไม่ต้องมีการบำบัดพิเศษหลังการใช้งานแต่ละครั้ง.
พื้นผิวที่ทนทานต่อการเช็ดทำความสะอาดเป็นประจำและการทำความสะอาดแบบล้ำลึกเป็นครั้งคราว ช่วยยืดอายุการใช้งานของสตูดิโอ ส่วนประกอบที่เปลี่ยนได้หรือชิ้นส่วนแบบโมดูลาร์ยังช่วยลดต้นทุนการบำรุงรักษาในระยะยาวได้อีกด้วย.
เมื่อการเลือกเฟอร์นิเจอร์ช่วยสนับสนุนกิจวัตรการทำความสะอาดประจำวัน สตูดิโอศิลปะกลางแจ้งจะยังคงความยั่งยืน แทนที่จะเป็นภาระ.
คิดให้ไกลกว่าตัวเลือกแต่ละอย่าง
แทนที่จะเลือกชิ้นส่วนที่แยกจากกัน ลองพิจารณาว่าเฟอร์นิเจอร์ทำงานร่วมกันเป็นระบบอย่างไร พื้นผิวทำงานแนวตั้ง โต๊ะแนวนอน หน่วยจัดเก็บ และชั้นตาก ควรสอดคล้องกับหลักการจัดวางที่กำหนดไว้ก่อนหน้านี้.
แผนผังเฟอร์นิเจอร์ที่ประสานงานกันอย่างดีจะช่วยส่งเสริมการไหลเวียนของการเคลื่อนไหว การมองเห็นเพื่อการดูแล และความชัดเจนของพื้นที่ เมื่อเฟอร์นิเจอร์และการจัดวางเข้ากัน สตูดิโอศิลปะกลางแจ้งจะมีความเป็นอันหนึ่งอันเดียวกัน แทนที่จะแตกแยก.
ขั้นตอนที่ 5 – วัสดุและอุปกรณ์สำหรับสตูดิโอศิลปะกลางแจ้ง
วัสดุอุปกรณ์เป็นสิ่งกำหนดประสบการณ์ของเด็กๆ ในสตูดิโอศิลปะกลางแจ้ง ในสภาพแวดล้อมกลางแจ้ง วัสดุอุปกรณ์ต้องทำหน้าที่มากกว่าแค่ส่งเสริมความคิดสร้างสรรค์ แต่ต้องทนทานต่อสภาพแวดล้อม ปลอดภัยภายใต้สภาวะที่หลากหลาย และเปิดโอกาสให้สำรวจได้อย่างอิสระและหลากหลาย.
ลำดับความสำคัญของวัสดุที่ไม่เป็นพิษและเหมาะสมกับสภาพอากาศ
งานศิลปะกลางแจ้งมักเกี่ยวข้องกับน้ำ ความร้อน และการสัมผัสแสงแดดเป็นเวลานาน ให้เลือกสี เม็ดสี และวัสดุสำหรับการปั้นที่ติดป้ายว่าไม่มีสารพิษและเหมาะสมสำหรับสภาพแวดล้อมทางการศึกษา.
เมื่อเป็นไปได้ ให้เลือกใช้วัสดุที่ทนต่อความชื้นและการเปลี่ยนแปลงอุณหภูมิได้โดยไม่สูญเสียความสมบูรณ์ ภาชนะควรปิดผนึกได้อย่างแน่นหนาเพื่อป้องกันการปนเปื้อนจากฝุ่นหรือแมลง.
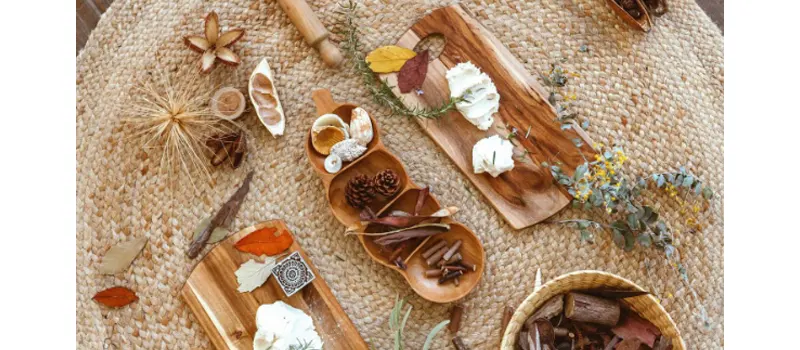
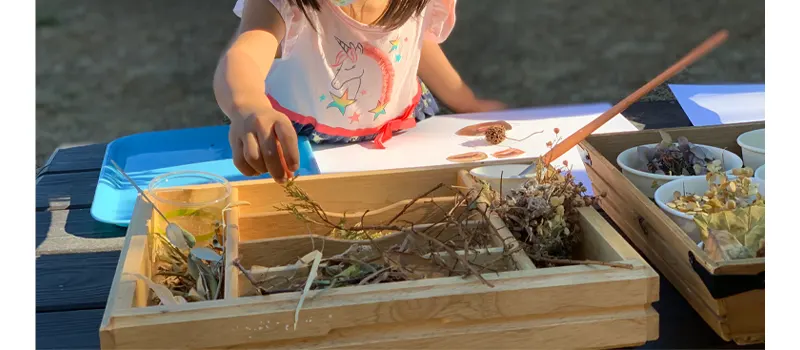
รวมวัสดุปลายเปิดและวัสดุธรรมชาติ
สตูดิโอศิลปะกลางแจ้งมอบโอกาสพิเศษในการผสมผสานองค์ประกอบธรรมชาติเข้ากับงานสร้างสรรค์ ชิ้นส่วนหลวมๆ เช่น ใบไม้ ก้อนหิน ฝักเมล็ด ทราย เปลือกไม้ และกิ่งไม้ สามารถกลายเป็นเครื่องมือทางศิลปะที่มีประสิทธิภาพ.
วัสดุเหล่านี้ส่งเสริมการทดลองและสนับสนุนการพัฒนาประสาทสัมผัส การหมุนเวียนวัสดุธรรมชาติตามฤดูกาลช่วยให้สภาพแวดล้อมมีความเคลื่อนไหวและเชื่อมโยงกับสภาพแวดล้อมในท้องถิ่น อย่างไรก็ตาม ควรตรวจสอบสิ่งของจากธรรมชาติอย่างสม่ำเสมอเพื่อความปลอดภัยและความสะอาดก่อนนำเข้าไปใช้ในสตูดิโอ.
จัดหาอุปกรณ์สร้างสรรค์หลัก
แม้ว่าวัสดุธรรมชาติจะช่วยเพิ่มความหลากหลาย แต่สิ่งของหลักๆ ก็ยังคงมีความสำคัญ สตูดิโอศิลปะกลางแจ้งที่สมดุล มักจะประกอบด้วย:
- สีและพู่กันชนิดล้างทำความสะอาดได้
- ชอล์กสำหรับพื้นผิวถนนหรือกระดาน
- ดินเหนียว หรือ ดินโพลิเมอร์
- วัสดุสำหรับทำคอลลาจ เช่น กระดาษ ผ้า และวัสดุรีไซเคิล
- เครื่องมือธรรมดา เช่น ลูกกลิ้ง ฟองน้ำ และตราประทับ
เป้าหมายไม่ใช่ความอุดมสมบูรณ์ แต่คือความหลากหลาย วัสดุควรสนับสนุนรูปแบบการแสดงออกที่หลากหลาย แทนที่จะเป็นโครงการที่ใช้ครั้งเดียว.
แผนการจัดเก็บและป้องกัน
สภาพอากาศภายนอกอาคารจำเป็นต้องมีการจัดการวัสดุอย่างรอบคอบ ควรเก็บวัสดุไว้ในภาชนะที่ปิดสนิทและกันสภาพอากาศได้เมื่อไม่ได้ใช้งาน วัสดุที่ไวต่อสภาพอากาศอาจจำเป็นต้องย้ายเข้าภายในอาคารในเวลากลางคืนหรือระหว่างสภาพอากาศที่รุนแรง.
จัดระเบียบวัสดุตามความถี่ในการใช้งาน สิ่งของที่ใช้บ่อยควรจัดเก็บไว้ในที่ที่หยิบใช้ได้สะดวก ในขณะที่วัสดุพิเศษควรจัดเก็บไว้อย่างปลอดภัยเพื่อป้องกันความเสียหาย การวางแผนการจัดเก็บที่มีประสิทธิภาพจะช่วยให้สตูดิโอศิลปะกลางแจ้งใช้งานได้จริงทุกวัน โดยไม่ต้องมีการตั้งค่าที่ยุ่งยากในแต่ละครั้ง.
สนับสนุนความยั่งยืนและการใช้งานอย่างรับผิดชอบ
โครงการศิลปะกลางแจ้งยังสามารถเป็นแบบอย่างความรับผิดชอบต่อสิ่งแวดล้อมได้อีกด้วย พิจารณาการนำวัสดุรีไซเคิล ภาชนะที่ใช้ซ้ำได้ และระบบสีที่เติมได้มาใช้ตามความเหมาะสม.
การสอนให้เด็กๆ ล้างแปรงอย่างถูกวิธี เก็บเครื่องมือ และดูแลวัสดุ เป็นการปลูกฝังความเคารพต่อสภาพแวดล้อมการเรียนรู้ร่วมกัน การจัดการทรัพยากรอย่างยั่งยืนช่วยลดขยะและลดต้นทุนการดำเนินงานในระยะยาว.
ขั้นตอนที่ 6 – ความปลอดภัย การดูแล และการบำรุงรักษา
สตูดิโอศิลปะกลางแจ้งควรเป็นแหล่งสร้างแรงบันดาลใจ แต่ต้องดำเนินงานได้อย่างปลอดภัยและยั่งยืน ความปลอดภัย การดูแล และการบำรุงรักษาไม่ได้แยกออกจากการตัดสินใจด้านการออกแบบ แต่เป็นส่วนหนึ่งของวิธีการวางแผนและการจัดการพื้นที่ในแต่ละวัน.
สร้างความปลอดภัยในสภาพแวดล้อม
ศิลปะกลางแจ้งนำเสนอตัวแปรที่พื้นที่ในร่มไม่พบเจอ ได้แก่ ความชื้น พื้นผิวที่ไม่เรียบ ลม และการสัมผัสกับแสงแดดโดยตรง ความปลอดภัยเริ่มต้นด้วยการเลือกเฟอร์นิเจอร์ที่มั่นคง พื้นผิวกันลื่น และวัสดุที่ปิดผนึกอย่างเหมาะสม.
สี กาว และวัสดุโมเดลลิ่งทั้งหมดควรเป็นไปตามมาตรฐานความปลอดภัยที่ใช้บังคับสำหรับการใช้งานในวัยเด็กเล็ก ในสหรัฐอเมริกา ซึ่งอาจรวมถึงการปฏิบัติตามกฎระเบียบ CPSIA สำหรับผลิตภัณฑ์สำหรับเด็ก ในแคนาดาและออสเตรเลีย มาตรฐานความปลอดภัยสำหรับผู้บริโภคที่คล้ายกันก็บังคับใช้เช่นกัน ควรตรวจสอบวัสดุและเฟอร์นิเจอร์ที่ได้รับการรับรองสำหรับการใช้งานด้านการศึกษาเสมอ แทนที่จะเป็นสภาพแวดล้อมทั่วไปสำหรับผู้บริโภค.
การตรวจสอบเป็นประจำก็มีความสำคัญเช่นกัน ตรวจสอบฮาร์ดแวร์ที่หลวม ขอบที่เป็นเสี้ยน ขาที่ไม่มั่นคง หรือพื้นผิวที่เสื่อมสภาพ การแก้ไขปัญหาเล็กน้อยตั้งแต่เนิ่นๆ จะช่วยป้องกันปัญหาด้านความปลอดภัยที่ใหญ่ขึ้นในภายหลัง.
รักษาการกำกับดูแลที่ชัดเจน
การดูแลในสตูดิโอศิลปะกลางแจ้งขึ้นอยู่กับการจัดวางพื้นที่เป็นอย่างมาก แนวสายตาที่ชัดเจนช่วยให้ครูสามารถสังเกตการณ์หลายโซนได้โดยไม่ต้องปรับเปลี่ยนตำแหน่งตลอดเวลา หลีกเลี่ยงการสร้างสิ่งกีดขวางทางสายตาในบริเวณส่วนกลาง หน่วยจัดเก็บที่สูงหรือโครงสร้างที่ยึดติดควรวางไว้ตามแนวขอบเท่าที่จะทำได้ กำหนดจุดดูแลที่สม่ำเสมอเพื่อให้เด็กๆ เข้าใจถึงความคาดหวังและขอบเขต.
การกำกับดูแลยังรวมถึงการจัดการขนาดของกลุ่มด้วย หากมีโซนสร้างสรรค์หลายโซนทำงานพร้อมกัน ให้แน่ใจว่าจำนวนพนักงานสอดคล้องกับข้อกำหนดใบอนุญาตในท้องถิ่น.
จัดทำตารางการบำรุงรักษาประจำวันและประจำฤดูกาล
สภาพแวดล้อมภายนอกต้องการการบำรุงรักษาบ่อยกว่าห้องเรียนในร่ม กิจวัตรประจำวันควรรวมถึงการเช็ดทำความสะอาดพื้นผิว การเทน้ำออกจากภาชนะ การตรวจสอบพื้นที่ระบายน้ำ และการจัดเก็บวัสดุอย่างเหมาะสม.
การบำรุงรักษาตามฤดูกาลอาจรวมถึงการเคลือบผิวไม้ใหม่ การตรวจสอบส่วนประกอบโลหะว่ามีการกัดกร่อนหรือไม่ และการปรับโครงสร้างบังแดด ในภูมิภาคที่มีสภาพอากาศรุนแรง วัสดุบางชนิดอาจต้องจัดเก็บไว้ในอาคารชั่วคราวในช่วงนอกฤดู.
โมเดลที่ใช้งานอย่างรับผิดชอบ
ความปลอดภัยและการบำรุงรักษาก็เป็นโอกาสทางการศึกษาเช่นกัน การสอนให้เด็กๆ ทำความสะอาดแปรง เก็บเครื่องมือ และเคารพวัสดุที่ใช้ร่วมกัน เป็นการเสริมสร้างความรับผิดชอบและความเป็นอิสระ เมื่อเด็กๆ ได้มีส่วนร่วมในการดูแลสภาพแวดล้อมสตูดิโอศิลปะกลางแจ้งจะไม่เพียงแต่เป็นพื้นที่สร้างสรรค์ แต่ยังเป็นบทเรียนในการเป็นผู้ดูแลอีกด้วย.
บทสรุป
การสร้างสตูดิโอศิลปะกลางแจ้งสำหรับเด็กก่อนวัยเรียนเป็นโครงการที่ให้ผลตอบแทนอย่างลึกซึ้ง ซึ่งให้ประโยชน์ในทันทีและยั่งยืนแก่เด็กๆ การนำกระบวนการสร้างสรรค์ไปสู่นอกอาคาร ช่วยให้เด็กก่อนวัยเรียนได้รับสภาพแวดล้อมที่กระตุ้นประสาทสัมผัสหลายด้าน ซึ่งพวกเขาสามารถแสดงออกได้อย่างอิสระ เชื่อมต่อกับธรรมชาติ และพัฒนาทักษะการคิดและการเคลื่อนไหวที่สำคัญ โดยไม่ต้องกลัวว่าจะทำให้เลอะเทอะ.
ด้วยการวางแผนเกี่ยวกับสถานที่ การออกแบบผังพื้นที่ที่มีการแสดงออกที่แตกต่างกันและโซนประสาทสัมผัส เฟอร์นิเจอร์ที่ทนทาน และหลักสูตรที่นำองค์ประกอบธรรมชาติมาปรับใช้ โรงเรียนเตรียมอนุบาลของคุณจะสามารถสร้างพื้นที่ที่มีพลวัตและเปลี่ยนแปลงอยู่เสมอ สตูดิโอนี้จะเป็นส่วนที่เด็กๆ ชื่นชอบที่สุดในแต่ละวันอย่างแน่นอน โอบกอดความยุ่งเหยิง ออกไปสูดอากาศบริสุทธิ์ และเฝ้าดูผู้สร้างสรรค์คนรุ่นต่อไปเติบโต.
หากคุณต้องการความช่วยเหลือใดๆ โปรดติดต่อเรา ทีมงานของเราให้บริการโซลูชันแบบครบวงจร ซึ่งรวมถึงการสนับสนุนการออกแบบเลย์เอาต์ ระบบเฟอร์นิเจอร์ภายนอกที่ปรับแต่งได้ และคำแนะนำเชิงปฏิบัติเพื่อให้แน่ใจว่าทุกองค์ประกอบทำงานร่วมกันได้อย่างลงตัว.
คำถามที่พบบ่อย
สามารถทิ้งอุปกรณ์ศิลปะและเฟอร์นิเจอร์ไว้ข้างนอกตอนกลางคืนได้อย่างปลอดภัยหรือไม่
เฟอร์นิเจอร์ที่แข็งแรงและผ่านการบำบัดสภาพอากาศสามารถวางทิ้งไว้ข้างนอกได้ตลอดทั้งปี อย่างไรก็ตาม วัสดุที่เสื่อมสภาพได้ง่าย เช่น กระดาษ ชอล์กที่ไม่ผ่านการบำบัด แปรง และสีน้ำ ควรเก็บไว้ในกล่องเก็บของกันน้ำสำหรับชานบ้าน หรือนำเข้าที่ร่มบนรถเข็นอเนกประสงค์เมื่อหมดวัน การทิ้งสีไว้ข้างนอกอาจทำให้สีแข็งตัว แห้ง หรือดึงดูดสัตว์รบกวนได้.
ต้องใช้พื้นที่เท่าใดในการสร้างสตูดิโอศิลปะกลางแจ้ง
ไม่มีข้อกำหนดขนาดที่ตายตัว โรงเรียนอนุบาลเล็กๆ อาจเริ่มต้นด้วยมุมสร้างสรรค์ที่กำหนดไว้อย่างชัดเจน ในขณะที่โรงเรียนขนาดใหญ่สามารถพัฒนาได้หลายโซน ปัจจัยสำคัญคือการจัดวางที่ใช้งานได้จริงมากกว่าพื้นที่ทั้งหมด เส้นทางการเคลื่อนไหวที่ชัดเจน การมองเห็นการดูแล และการแยกพื้นที่เปียกและแห้งมีความสำคัญมากกว่าขนาดเพียงอย่างเดียว.
เราจะจัดการแมลงอย่างผึ้งและยุงในโซนเปียกและโซนตามประสาทสัมผัสได้อย่างไร
แมลงมักจะถูกดึงดูดโดยน้ำที่ขังและกลิ่นหอมหวาน ตามธรรมชาติ เพื่อลดปัญหานี้: ให้เทน้ำทิ้งจากถังของเล่นที่เต็มไปด้วยสิ่งของต่างๆ, ครัวโคลน, และอ่างล้างหน้าทุกวัน; อย่าปล่อยให้น้ำขังค้างคืนเด็ดขาด หลีกเลี่ยงการใช้สบู่หรือสีน้ำที่ผสมน้ำหอมหรือมีกลิ่นหวาน นอกจากนี้ ควรพิจารณาปลูกต้นไม้ที่ช่วยไล่แมลงตามธรรมชาติ (เช่น ดาวเรือง หรือ ลาเวนเดอร์ หากไม่เป็นพิษและได้รับอนุญาตจากหน่วยงานที่เกี่ยวข้อง) ใกล้กับบริเวณกิจกรรมศิลปะ.
วิธีที่ประหยัดที่สุดในการเริ่มต้นสตูดิโอศิลปะกลางแจ้งคืออะไร
เริ่มต้นด้วยการนำสิ่งของเก่ามาดัดแปลง! ขอให้บริษัทสาธารณูปโภคในท้องถิ่นบริจาคแกนม้วนสายเคเบิลไม้เปล่า (ซึ่งสามารถทำเป็นโต๊ะที่แข็งแรงยอดเยี่ยมได้เมื่อขัดแล้ว) ขอให้ผู้ปกครองบริจาคหม้อ กระทะ และทัพพีไม้เก่าสำหรับครัวโคลน คุณสามารถหนีบแผ่นกระดาษขนาดใหญ่เข้ากับรั้วได้โดยตรงเพื่อทำขาตั้งภาพวาดแบบไม่มีค่าใช้จ่าย ลงทุนงบประมาณจริงของคุณไปกับของใช้พื้นฐานคุณภาพสูงสองสามชิ้น เช่น สีล้างทำความสะอาดได้แบบขายส่ง และกล่องเก็บของกันน้ำสำหรับงานหนัก.
การสร้างสตูดิโอศิลปะกลางแจ้งจะมีผลต่อการอนุญาตดูแลเด็กหรือการตรวจสอบความปลอดภัยของเราหรือไม่
โดยทั่วไปแล้วไม่ เป็นไปตามมาตรฐานความปลอดภัย ปัญหาที่พบบ่อยที่สุดมักเกิดจากการบดบังสายตาของครู หรือการสร้างอันตรายจากการลื่น ตรวจสอบให้แน่ใจว่าการจัดวางของคุณช่วยให้ครูสามารถมองเห็นเด็กทุกคนตลอดเวลา หลีกเลี่ยงพื้นที่เปียกจากบริเวณที่ผู้คนสัญจรพลุกพล่าน และตรวจสอบให้แน่ใจว่าโครงสร้างถาวรใดๆ เป็นไปตามข้อกำหนดความสูงและข้อบังคับการยึดตามท้องถิ่น.