A sensory room is a dedicated area in a school designed to help students manage sensory overload, emotions, and focus in a supportive environment. The most effective school sensory rooms usually include soft seating for emotional regulation, gentle lighting for visual calm, movement options like swings or balance paths, and tactile materials that help children focus through touch. These elements work together to reduce stress, improve concentration, and support students who struggle with sensory overload during the school day.
Sensory rooms are no longer only for special education classrooms. More schools are creating these spaces because many children benefit from having a structured environment to manage emotions and energy levels. The key is choosing ideas that fit real school routines, supervision needs, and available space.
This guide shares practical, realistic sensory room ideas for school spaces, along with layout strategies that help schools create environments that truly support daily learning and regulation.
Visual Sensory Room Ideas
Visual input is often the most immediate and powerful way to regulate a student’s nervous system. Whether you need to calm an anxious child with slow, rhythmic light patterns or engage a lethargic student with high-contrast tracking activities, the visual environment sets the emotional tone for the entire session.
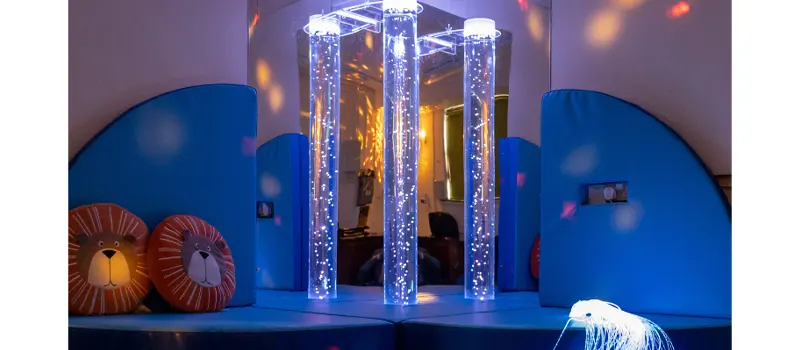
1. Bubble Tube
The cornerstone of many sensory rooms, a bubble tube provides mesmerizing visual tracking and gentle vibration/humming, which has an immediate soothing effect on the nervous system. Students often find the steady upward motion of bubbles predictable and reassuring, which helps reduce anxiety and supports emotional regulation.
Set Up Tips for Schools:
- Ensure Safe Positioning
Secure the base properly and keep walkways clear. Students should be able to approach it safely without bumping into other equipment. - Control Surrounding Lighting
Keep nearby lighting dim and avoid strong overhead lights. The bubble tube works best when it is the primary visual focus in that part of the room. - Maximize Visual Impact
Do not place the tube alone in an open space. Install acrylic mirrors on the walls behind it to create an expanded visual effect that makes the light appear to multiply, helping a small area feel more immersive without adding extra stimulation.
2. Fiber Optic Light Strands
Fiber optic strands introduce low-intensity point light that students can gather, separate, or drape over their hands. Because the light source is distributed across many small fibers rather than one bright bulb, the visual input feels soft and close ranged. The combination of subtle color change and hand movement often helps shift attention away from stress.
Set Up Tips for Schools:
- Create a “light Shower” Effect
Mount the fiber optics higher on the wall using a secure bracket so the strands cascade downward like a waterfall. Place a large bean bag or floor cushion underneath so a student can sit and draw the strands around their body. This setup creates a sense of enclosure and visual immersion without isolating the student from supervision. - Keep It as a Single Focal Feature
Avoid combining with projections or flashing lights nearby. Too many visual effects compete for attention and reduce the calming quality.
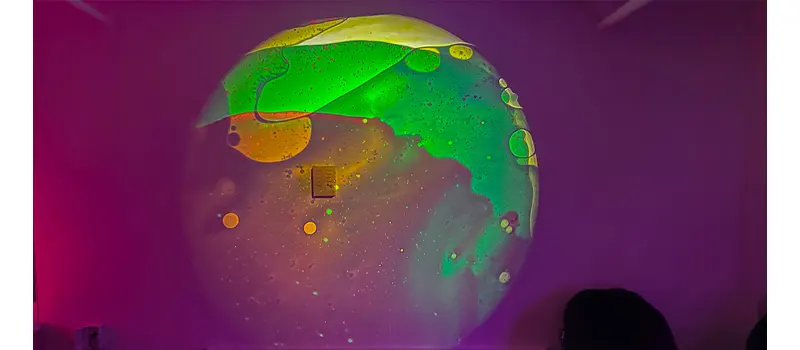
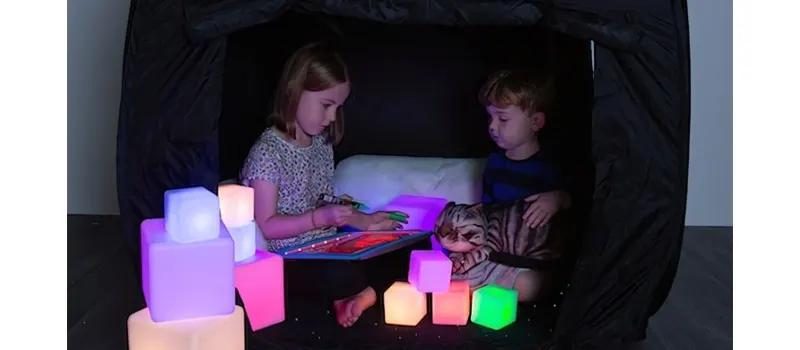
3. Projected Light Wall
A projected light wall introduces large-scale, slow-moving visual input that fills the field of view without requiring students to handle equipment. Unlike small light sources, wall projections create a distant focal point, which helps reduce visual pressure and allows the eyes to settle.
Set Up Tips for Schools
- Project onto a Blank Surface
Use a clear wall without shelves, posters, or texture. Visual clutter breaks the continuity of the projection and reduces its calming effect. - Position Above Direct Eye Level
Mount the projector so students are looking slightly upward rather than straight into the beam. This prevents glare and makes viewing more comfortable. - Choose Slow, Low Contrast Visuals
Avoid fast motion, sharp patterns, or flashing transitions. The goal is sustained attention, not stimulation.
4. Light Panel Or Light Table
Light table transforms visual input into a task-based activity rather than passive watching. The illuminated surface increases contrast and highlights shape, edges, and color differences, which naturally draws visual attention into a small, controlled area. Because the light comes from below and stays stable, it supports sustained focus and quiet hand use.
Set Up Tips for Schools
- Define The Working Boundary
Use a shallow edge, tray lip, or border to contain materials. This prevents pieces from spreading and keeps the illuminated area visually organized. - Select Materials That Work With Light
Choose items that transmit, reflect, or modify light rather than block it. Translucent acrylic shapes, transparent colored blocks, thin fabrics, natural leaves, or image sheets interact with the illuminated surface to create contrast, shadow, and layered visual effects. - Separate Materials By Visual Effect
Store high-transparency materials separately from textured or semi-opaque ones. Mixing too many visual effects at once reduces clarity and focus.
Tactile Sensory Sensory Room Ideas
Tactile input helps students understand their body in space and shift attention from internal stress to physical sensation. In a school sensory room, sensory toys and equipment should offer clear, contained touch experiences that scatter focus. The goal is to provide surfaces, textures, and hand-based interactions that organize the sensory system through predictable physical feedback.
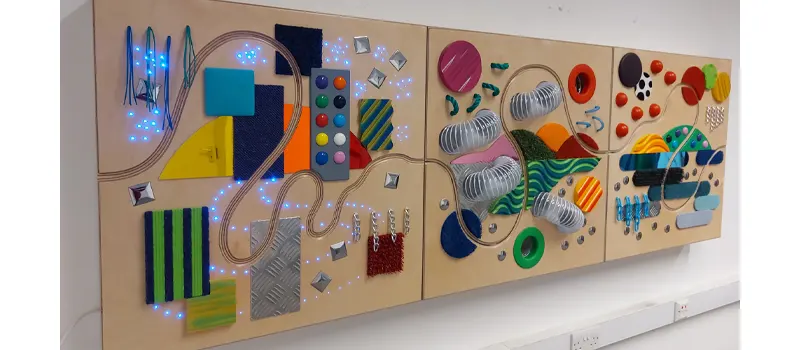
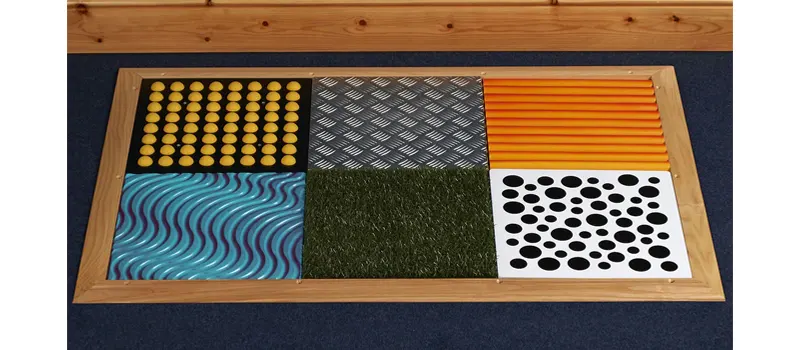
5. Texture Wall Panels
Perfect for schools with limited floor space, Texture wall panels (or Sensory Walls) provide a vertical surface for tactile exploration without cluttering the room. These panels feature a variety of materials—from rough artificial grass and reversible sequins to smooth acrylic and soft fur—allowing students to engage in “tactile discrimination” activities or self-soothe through repetitive touching.
Set Up Tips for Schools
- Mount At Multiple Heights
Install panels at varying heights. A lower row is essential for younger students and wheelchair users, while a higher row accommodates standing students. This ensures the sensory experience is inclusive for the entire class. - Create a “Sensory Hallway”
You don’t need a dedicated room for these. Mount durable texture panels along a corridor wall to create a “Sensory Walk.” This allows students to get “touch input” while transitioning between classes, helping to regulate energy levels and reduce hallway disruptions. - Prioritize Hygiene and Maintenance
In high-traffic school environments, cleanliness is a priority. Opt for panels with wipeable, non-porous surfaces (like plastic ridges, mirrors, or metal beads) for public corridors, and reserve fabric or fur textures for supervised, specific sensory rooms where they are easier to keep clean.
6. Sensory Bins Station
UN sensory bin station offers contained tactile exploration using materials that can be scooped, poured, or sifted. The resistance and movement of loose materials provide continuous feedback through the hands, which can help organize attention during moments of restlessness.
Set Up Tips for Schools
- Control the Mess
Teachers often avoid sensory bins due to the cleanup. To solve this, place the bins on a heavy-duty waterproof splat mat or use a dedicated sand & water table with deep basins. This keeps the materials contained and makes sweeping up spills quick and easy. - Integrate with Curriculum
Turn tactile play into a learning opportunity. Hide plastic alphabet letters, numbers, or geometric shapes inside the bin filled with sand or rice. Ask students to “dig” for the items and identify them, combining sensory regulation with literacy or math practice. - Hygiene and Storage
In a shared classroom, hygiene is key. Use clear plastic bins with snap-tight lids. This allows the materials to be safely stored away when not in use, preventing dust accumulation or spills, and ensuring the contents stay fresh for longer periods.
7. Tactile Floor Path
A tactile floor path provides sensory input through the feet, offering grounding feedback while moving through the room. Different textures underfoot can help students slow down and become more aware of body movement.
Set Up Tips for Schools
- Create Functional Transitions
Instead of placing the mats in a random corner, use the path to connect two functional zones (e.g., leading from the desk area to the reading nook). This allows students to get a quick “sensory reset” while moving between activities, helping to reduce behavioral disruptions during transitions. - Non-Slip Backing
In a school setting, safety is paramount. Ensure all mats have a high-quality non-slip rubber backing. If you are placing the path on a smooth vinyl classroom floor, consider using double-sided carpet tape to secure the edges and prevent slipping or tripping hazards. - Mix Hard and Soft Textures
For the most effective sensory input, alternate the types of mats. Place a squishy Liquid Floor Tile next to a rigid Textured Stepping Stone.
8. Fidget Tools Bar
Small but powerful, fidget tools are handheld devices designed to help students channel restless energy without disrupting the class. Whether it is a spinner, a squishy ball, or therapy putty, these tools allow for “stimming” (self-stimulatory behavior).
Set Up Tips for Schools
- Prioritize Silent Options
To keep the classroom peaceful, stock your inventory with silent fidgets like spiky sensory rings, marble mesh tubes, or silent resistance putty. Avoid clicky or noisy toys that might distract other students during quiet study time. - Establish “Tool vs. Toy” Rules
Successful implementation requires clear boundaries. Teach students that fidgets are tools for listening, not toys for playing. A common rule is: “The tool must stay in your hands (not in the air), and your eyes must stay on the teacher.” If it becomes a distraction, it goes back into the kit for a break. - Group Tools
Place squeeze tools together, twist tools together, and stretch tools together. Similar movement types help students choose more easily.
Movement And Vestibular Sensory Room Ideas
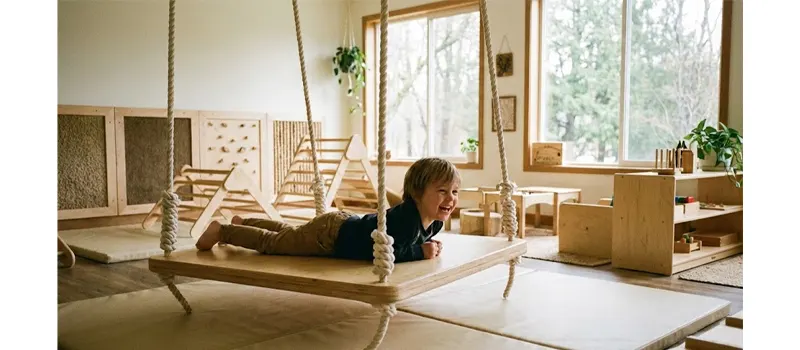
A platform or therapy swing provides rhythmic, predictable movement that stimulates the vestibular system. Because the motion can be linear or gentle circular, it allows controlled movement while the body remains supported.
9. Platform Swing Or Therapy Swing
A platform or therapy swing provides rhythmic, predictable movement that stimulates the vestibular system. Because the motion can be linear or gentle circular, it allows controlled movement while the body remains supported.
Set Up Tips For Schools
- Safety Is the Absolute Priority
Before purchasing, verify that your ceiling beam or support structure can handle the dynamic load (swinging weight), which is much higher than static weight. Use professional heavy-duty suspension kits that include a rotational device (swivel) to prevent the rope from twisting and stressing the mount. - Establish a “Fall Zone”
Never install a swing over a hard floor. You must place high-density crash mats underneath the swing area. The mat coverage should extend at least 6 feet (approx. 1.8 meters) in all directions from the swing’s center to ensure safety if a student tumbles out. - Ensure 360-Degree Clearance
Space planning is critical. Ensure the swing has enough clearance from walls, shelves, and other equipment. A crowded swing area is a safety hazard. If space is tight, consider a removable suspension system so the swing can be taken down and stored when not in use to free up floor space.
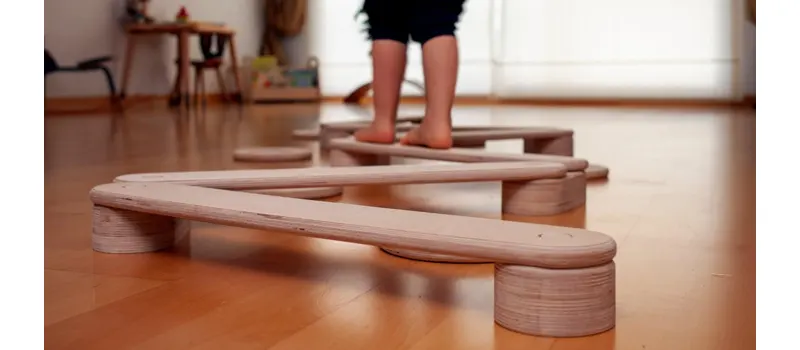
10. Modular Balance Pathway
A Balance Pathway (often composed of interlocking balance beams or “river stones”) is essential for developing gross motor skills, core stability, and coordination. By navigating these elevated paths, students engage their vestibular system and practice motor planning. It turns the classic “the floor is lava” game into a structured therapeutic activity that builds confidence and physical resilience.
Set Up Tips For Schools
- Prioritize Modularity and Storage
Space is always at a premium. Choose stackable river stones or connectable balance beams that can be easily disassembled and stored in a closet when not in use. Avoid bulky, one-piece wooden structures unless you have a permanent soft-play room. - Create Progressive Challenges
Design the course to accommodate different skill levels. Start with wide, flat beams for beginners to build confidence. As students improve, introduce curved pieces, wobble boards, or stones with varying heights to increase the difficulty and require more focus and core engagement. - Safety on Any Surface
Slipping is the main risk here. Ensure every component has a high-quality rubberized non-slip base that grips firmly on gym floors, vinyl tiles, or carpet. If the equipment is higher than 20cm (8 inches), place gym mats alongside the path to cushion any accidental stumbles.
11. Crash Mat Area
Beyond providing safety for climbing or swinging activities, these oversized, high-density foam mats serve a therapeutic purpose: they allow high-energy students to jump, roll, and “crash” safely. This heavy impact provides intense proprioceptive feedback (deep pressure) to the muscles and joints, which is highly organizing for the nervous system and helps “reset” a dysregulated student.
- The “Sensory Sandwich” Technique
Don’t just leave the mats on the floor. Buy lighter, bi-fold or tri-fold mats that can be used for deep pressure therapy. An occupational therapist or teacher can gently press a mat on top of a student lying on another mat (making a “sandwich”) to provide calming, deep-touch pressure during a meltdown. - Vertical Wall Protection
In small rooms, active play can get rowdy. Mount velcro-backed wall mats or lean sturdy folding mats against the lower half of the walls. This creates a fully padded zone where students can safely bump into boundaries without risk of injury or damage to the drywall. - Define The Landing Zone Clearly
Use a mat with a contrasting edge or floor border so students visually recognize where to land. Clear visual limits reduce uncontrolled movement.
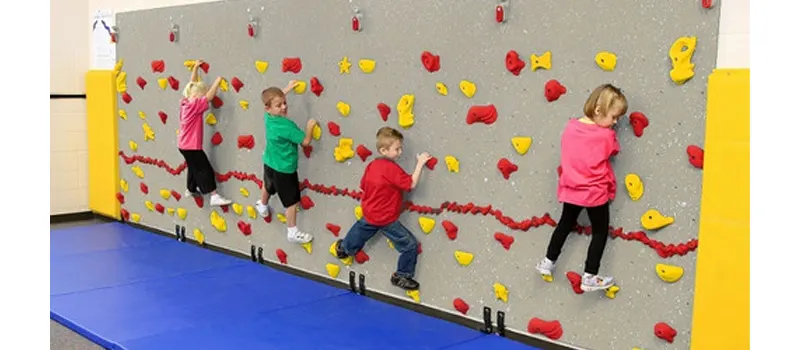
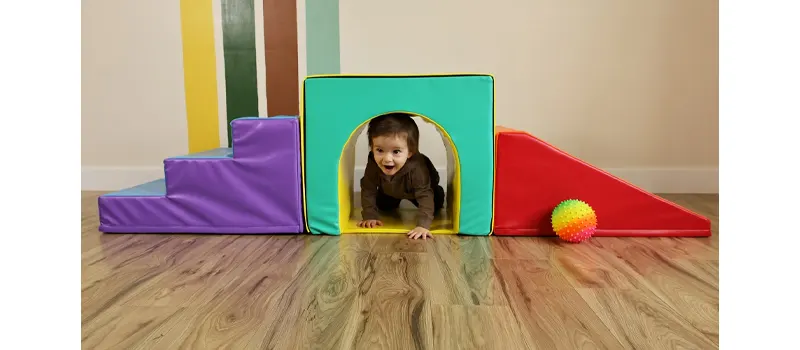
12. Indoor Climbing Wall
Climbing is a powerhouse activity for sensory regulation. A traverse climbing wall provides intense “heavy work” (proprioceptive input) that helps organize a scattered nervous system. By requiring students to pull, push, and hold their body weight, it builds core strength, motor planning skills, and confidence, all while burning off excess energy in a controlled manner.
Set Up Tips for Schools
- Focus on Lateral Movement
For school settings, install a “Traverse Wall” rather than a vertical high wall. This keeps students at a safe distance from the ground, eliminating the need for ropes, harnesses, or high ceilings, while still providing the necessary physical challenge. - Mandatory Safety Surfacing
Even with low walls, safety is non-negotiable. You must install impact-absorbing gym mats along the entire base of the wall. Ensure the mats extend out at least 6 feet (1.8m) to create a proper fall zone that meets ASTM safety standards. - Lock It Down
To prevent unauthorized use when a teacher isn’t present, choose a system that comes with a lockable mat closure. These mats fold up against the wall and lock in place to cover the handholds, effectively “closing” the wall and preventing students from climbing without supervision.
13. Natural Wooden Climbing Frames
Wooden Climbing Frames (such as Pikler triangles, arches, or rocking boats) offer a “natural” alternative to bright plastic equipment. These sturdy structures provide excellent proprioceptive challenges and vestibular input but fit seamlessly into a “calming” classroom aesthetic. The warmth and texture of wood also offer a grounding tactile experience that synthetic materials cannot match.
- Create a “Low-Stimulation” Active Zone
Bright colors can sometimes overstimulate students with dysregulated behavior. Use wooden climbers to create an active play corner that feels organic and peaceful. This is particularly effective for students who need to burn energy but are easily overwhelmed by the “visual noise” of traditional multi-colored playgrounds. - Maximize Utility with Dual-Purpose Use
Wooden arches are incredibly versatile. Use them curve-side down as a rocking boat for balance training. Flip them over to create a climbing bridge. Throw a weighted blanket over a Pikler triangle to instantly transform it into a dark, cozy sensory den for quiet time. - Regular Maintenance Checks
Unlike plastic, wood is a natural material that reacts to humidity. Establish a routine to check that all screws remain tight and the surface remains smooth. Ensure the product is finished with a non-toxic, water-based varnish so it is easy to wipe clean and free from potential splinters.
14. Soft Play Mini Climbing Set
For younger students or those with limited mobility, a standard climbing wall may be too intimidating. A soft play climbing set consisting of foam ramps, stairs, tunnels, and platforms offers a safe, approachable alternative. These structures allow students to practice motor planning and balance on a smaller scale, building the confidence they need before graduating to larger equipment.
Set Up Tips for Schools
- Ensure Stability
Loose foam blocks can slide apart and cause falls. Look for sets that feature heavy-duty Velcro connecting strips or anti-slip bases. This ensures the structure stays locked together as a solid unit while students crawl and climb over it. - Utilize Corner Spaces
To maximize floor space, arrange the set in a corner. This provides two walls of support for students who are still unsteady on their feet, adding an extra layer of security and encouraging them to pull themselves up to a standing position. - Keep it Fresh
One of the best features of modular soft play is versatility. Rotate the configuration every few weeks, turn a tunnel into a boat, or rearrange the stairs to create a “new” challenge that keeps students engaged without costing a penny.
Auditory Sensory Room Ideas
Auditory input shapes how alert or calm the body feels. In a school sensory room, sound should reduce environmental noise rather than add more stimulation. The goal is to create predictable, low-intensity auditory conditions that help students shift attention inward and stabilize breathing and posture.
15. White Noise or Nature Sound Station
A white noise or nature sound station introduces a steady, non-changing background sound that masks sudden environmental noises. Consistent sound reduces the impact of unpredictable hallway noise, voices, or movement outside the room.
Set Up Tips for Schools
- Create a “Sonic Barrier”
Positioning is key. Place the sound machine near the source of the distraction (e.g., near the classroom door or a thin wall) rather than right next to the students. This helps to effectively “mask” or block incoming noise before it reaches the learners’ ears. - The Headphone Option
Sound is subjective; what soothes one student may annoy another. Create a “listening hub” by connecting a multi-port headphone splitter to the sound station. This allows individual students to plug in and “tune out” the world without altering the sound environment for the entire class.
16. Noise Reduction Earmuffs
For students with auditory hypersensitivity, the typical “background noise” of a classroom (scraping chairs, buzzing fluorescent lights, or distant chatter) can be physically painful and distracting. Noise reduction earmuffs act as a “volume knob” for the world. They dampen ambient noise to a manageable level, allowing students to filter out distractions and focus on their work.

- The “Traffic Light” System
To help teachers understand the students’ needs without interrupting them, use color-coded stickers on the earmuffs. A green sticker means “I can still hear you/I am open to questions,” while a red sticker signals “I need total focus/Please do not disturb.” This empowers the student to set boundaries non-verbally. - Stockage accessible
Install low hooks near the door or in the “Quiet Corner” where students can grab a pair independently. Encouraging self-advocacy, letting the student decide when they need to lower the volume, is a key part of emotional regulation.
Olfactory And Gustatory Sensory Room Ideas
Olfactory and gustatory input influence regulation through internal sensory pathways. In school sensory rooms, these elements should be subtle, optional, and carefully managed to avoid overstimulation or allergies.
17. Aromatherapy Scent Station
An Aromatherapy Station uses specific scents to instantly shift the energy of a room. For example, lavender or chamomile can calm a dysregulated class, while peppermint or citrus can “wake up” a lethargic group during a morning slump.
- Use Passive Scent Sources
Choose scent pouches, cotton pads with diluted essential oils, or sealed scent jars instead of active diffusers. Passive sources prevent the smell from filling the whole room. - Keep Scents In Individual Containers
Some schools have strict “fragrance-free” policies due to allergies. A great workaround is creating individual sensory smell jars. Place a cotton ball with a drop of essential oil inside a sealed plastic jar. Students can open the jar to take a “calming sniff” personally without scenting the entire room or triggering others’ allergies. - Use Neutral, Widely Tolerated Scents
Mild options such as lavender, chamomile, or citrus peel are generally less intrusive than strong perfumes.
18. Oral Motor Chew Tools (Chewelry)
While “taste” usually involves food, in a sensory room context, the need is often for oral proprioception (the need to chew or bite). Many students chew on shirts, pencils, or fingers to self-regulate. Providing safe, designated chewy necklaces or pencil toppers creates a hygienic outlet for this need, protecting students’ teeth and clothing.

- Hygiene Protocols are Non-Negotiable
These are personal items, not shared toys. Ensure every chew toy can be easily washed with soap and water or is dishwasher safe. If a school buys them, they should be labeled for individual students or sent home to be cleaned daily. - Offer Texture Variety
Just like food, students have texture preferences. Offer a mix: smooth chewies for those who like a clean feel, and textured/studded chewies for those who seek intense sensory input. Providing the wrong texture might lead to the student rejecting the tool. - Keep At A Seated Regulation Area
To prevent choking hazards, establish a strict rule: chew tools can only be used when the student is stationary (seated or standing still). They must never be used while running, jumping, or during active play on the playground. - Mandatory Adult Supervision
These are therapeutic tools, not toys. They should always be used under direct teacher supervision. Do not allow students to trade or share these items, and ensure they are stored securely by the teacher when not in active use to prevent unsupervised chewing.
Sensory Room Ideas About Calming And Regulation
Calming zones are designed to lower sensory input, slow body movement, and create a sense of containment. Unlike activity-based areas, this part of the sensory room should reduce visual, auditory, and movement stimulation. The environment works by limiting incoming information and giving the body stable support, which helps breathing, posture, and emotional state gradually settle.
19. Soft Seating Corner
Soft seating options like high-back bean bags, foam rockers, or floor cushions that mold to the student’s body. This ergonomic support reduces the physical strain of sitting still and allows students to wiggle and adjust their posture, which paradoxically helps them focus better on listening and reading tasks.
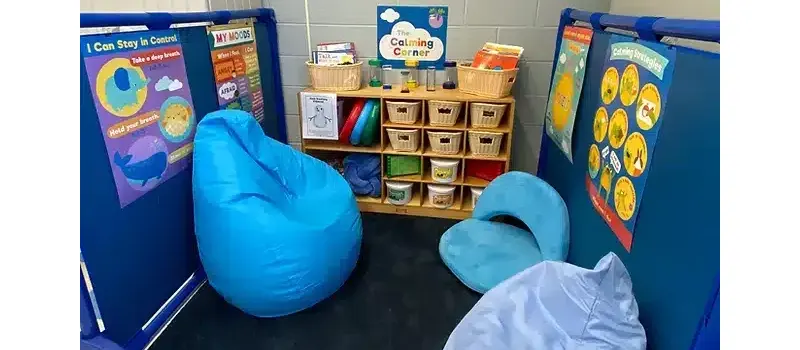
- Define the Zone
Place these seats on a distinct area rug or use low shelves to box in the corner. This visual boundary signals to students that this is a specific “break zone” or “reading nook,” preventing the furniture from drifting into the main teaching area. - Offer Posture Variety
Not every student relaxes the same way. Provide a mix: a Bean Bag Lounger for full-body relaxation, a Rocking Chair for rhythmic movement, and Floor Cushions for those who prefer to sit cross-legged near the ground.
20. Weighted Blanket Station
Deep Pressure Stimulation (DPS) is scientifically proven to reduce cortisol (stress) and boost serotonin (calm). A Weighted Blanket Station provides accessible tools heavy blankets, lap pads, or shoulder wraps that mimic the feeling of a firm hug, helping anxious or overwhelmed students ground themselves quickly.
- Adhere to the “10% Rule”
- Establish a clear protocol: a weighted blanket should generally not exceed 10% of the student’s body weight plus 1-2 pounds. Label your blankets clearly by weight (e.g., “5 lbs,” “7 lbs”) so staff can easily select the safe option for each child.
- Visible Storage
Don’t hide them in a cupboard. Use a dedicated mobile trolley or open shelving unit to display the items. This visibility encourages students to self-advocate and request a “heavy blanket” when they feel their anxiety rising, fostering independence.
21. Cozy Tent Or Quiet Pod
A cozy tent or quiet pod offers an immediate escape from visual and auditory overload. It serves as a “pause button,” providing a darker, enclosed, and predictable space where a student can retreat to de-escalate a meltdown before returning to the group.
- Framing Matters
This space should never be used as a punishment. It is a positive tool for self-regulation. Place comfortable cushions and a few fidget tools inside to make it an inviting sanctuary, not a prison. - Ensure Teacher Visibility
While the student needs privacy, the teacher needs to ensure safety. Choose a tent or pod with mesh windows or a designated “peek-a-boo” opening. This allows the student to feel hidden while allowing the teacher to subtly monitor their well-being without intruding. - Acoustic Considerations
For a premium solution, consider an Acoustic Pod (foam-lined structure). If the budget is tight, place a standard pop-up tent in the quietest corner of the room and drape a sound-dampening blanket over the top (leaving ventilation gaps) to muffle classroom noise.
FAQ
What does a sensory room do?
A sensory room provides a controlled environment where students can manage sensory input, calm their bodies, and regain focus. It helps reduce overstimulation, supports emotional regulation, and allows students to return to the classroom in a more organized and ready state.
How much does it cost to set up a sensory room in a school?
Costs vary depending on room size, layout, and the types of sensory features included. Welcome to contact us, share basic room dimensions, photos, or a floor plan so the setup can be evaluated, and equipment priorities can be suggested based on the available space.
Are sensory rooms only for autistic people?
No. While sensory rooms are often associated with autism support, many students benefit from access to a calm, structured sensory space. Children experiencing anxiety, attention challenges, emotional overload, or difficulty concentrating can all use sensory tools to regulate. Schools increasingly use sensory rooms as inclusive support spaces, not condition-specific rooms.
How long should a child be in a sensory room?
Sensory room use is usually short and purposeful. Many schools use brief sessions, often 10-15 minutes, to help a student reset before returning to learning. The room works best as a regulation break rather than a place for extended time away from class.
Are these sensory products safe for unsupervised use?
No. While our products are built to high commercial safety standards, we strongly recommend that all sensory activities be supervised by an adult. Items like weighted blankets, chew tools, and swings have specific usage protocols to ensure student safety.
Conclusion
Creating an effective sensory room in a school needs to understand how different sensory inputs work together. Visual features, tactile materials, movement elements, calming zones, sound control, and even scent or oral tools each play a role in helping students regulate their bodies and emotions. When these elements are thoughtfully grouped into functional zones, the sensory room becomes a structured support environment that improves focus, behavior, and readiness to learn.
Every school space is different, and the layout, room size, and student needs all influence which sensory room ideas for school settings will work best. Careful planning helps avoid overstimulation, equipment misuse, and unnecessary costs while ensuring the room truly serves its purpose as a regulated space.
If your school is considering setting up or improving a sensory room, sharing room dimensions, photos, or a floor plan can make planning more accurate. We support schools with layout planning and provide appropriate sensory equipment, helping turn available space into a practical, well-organized sensory environment that fits daily school routines.